notification
look
Share
The hot topic of digital “cameras” right now is the iPhone 16 series. There are two series, the “iPhone 16” and the “iPhone 16 Pro”, but since they have a lot in common, I would like to review both of them in two parts from the perspective of their “cameras”.
In this article (Part 1), we will take a look at the new “Camera Control” interface and check out the basic image quality .
Unless otherwise specified, in this article, iPhone 16 collectively refers to the “iPhone 16” and “iPhone 16 Plus,” and iPhone 16 Pro collectively refers to the “iPhone 16 Pro” and “iPhone 16 Pro Max.”
table of contents
Amazingly, there are now five shutter buttons!
Points to check in “Camera Control”
Check the basic image quality of the camera!
Let’s compare some basic examples
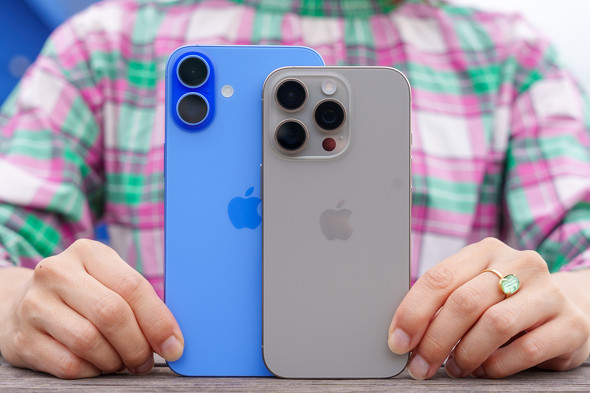
On the left is the iPhone 16 Plus, and on the right is the iPhone 16 Pro. The Pro is not the Max, so the sizes are not the same, but please forgive me. The iPhone 16 stands out because the cameras are arranged vertically.
Amazingly, there are now five shutter buttons!
The iPhone 16 and iPhone 16 Pro have added a button called “Camera Control.” The iPhone 16 also has the “Action Button” that was added to the iPhone 15 Pro.
It feels like there are a lot of buttons.
Let’s say you assign “camera” to the action button. In that case, pressing and holding the action button will launch the camera. In this case, when the camera is launched, the action button will also function as a shutter button.
Special
-PR-
iPhone Store
If you add in the two volume buttons, there are a total of three shutter buttons.
You can assign “Camera” to the action button in the “Action Button” settings. Press and hold this to launch the camera.
Next is the new camera control. Clicking this (pressing and releasing) will launch the camera.
And in the camera app, it acts as a shutter button. This is the fourth shutter button.
New camera controls. The photo is of the iPhone 16 Plus. It’s wider so it can be used like a touch bar.
And there’s also a shutter button on the camera app screen. That means there are a total of five shutter buttons on the left and right sides and in three places on the screen , which is either convenient or confusing.
There are three buttons on the left and right sides and on the screen, and all three on the left side can be used as shutter buttons, making a total of five.
Personally, I like the fact that “no matter how you hold it, you can press the shutter on any angle,” so it’s fun to take pictures at odd angles when holding it in odd ways…but there have also been an increasing number of cases where people accidentally press the shutter and take an unexpected photo .
Points to check in “Camera Control”
And there’s the camera control, which is something to look out for. There are three points to check.
What about the position of the shutter button?
It seems like it can do a lot of things, but is it easy to use?
Can you customize it?
Let’s check them one by one.
Point 1: Is the location easy to press as a shutter button?
The camera control has various functions for controlling the camera, but it is most commonly used as a shutter button.
When the body is held horizontally, it seems like the shutter button would be easier to press if it was located here.
However, there are pros and cons to this position .
For example, Sony’s Xperia 1 series has always had a shutter button on the side, but it’s located a little further out on the edge.
The shutter button on the Xperia 1. It’s on the edge, and the surface treatment is different from others, making it easy to press as a shutter button.
Which is correct? It depends largely on how you hold your smartphone .
People who are used to using cameras tend to hold the camera with their middle finger on the back, as shown in the photo above. Then, they press the shutter with their index finger, so the Xperia 1 series is the right position. The iPhone 16 and iPhone 16 Pro are too far from the index finger.
When you hold the camera like this, the camera controls are a little far away and it’s hard to press the shutter. Pay attention to how you use your middle finger.
もう1つ、カメラを上下から挟むように持つ人もいる。こういう持ち方だと、iPhone 16やiPhone 16 Proのカメラコントロールはちょうどいい位置なのである。
昔、この持ち方はコンパクトデジタルカメラの“悪い持ち方”の代表として取り上げたことがあるのだけど(手ブレしやすく安定しないのだ)、まあ、手ブレ補正も昔に比べて強力だし、今だと正しい持ち方も何もないのかもしれない。
上下から挟むように持つと人差し指がちょうどいい位置に来る
Appleがどういう持ち方を想定してこの位置に置いたのかは知らないけど、わたしはカメラコントロールの位置に合わせて上下挟み持ちをするようになっちゃいました。
ポイント2:カメラコントロール自体は使いやすい?
カメラコントロールは、それ自体がタッチセンサーになっていて、軽く押すとクッと軽い衝撃があり、その状態ですりすりすると設定を変えられるし、ダブルタップすると設定項目を変えられる。
で、最後までグッと押し込むと(ここは物理的に実際に押し込める)撮影できるというわけだ。
カメラコントロールを使ってカメラを切り替えているの図。人差し指を左右に動かして調整できる
これらができるから「カメラコントロール」と名付けられたのだろうけど、ただ、これで細かい設定をしやすいかというと、それは難しい。
カメラコントロールで調整できるのは「露出補正」「ズーム倍率」「カメラ切替」「フォトグラフスタイル」「トーン」「被写界深度(ポートレート時のボケ調整)」の6つ。これはかなりぜいたくに搭載しましたな、って感じだ。
カメラの切り替え。「0.5x」「1x」「2x」を切り替えられる(iPhone 16 Proの場合は「5x」も選べる)。「1.2x」や「1.5x」は選べない
ズーム。こちらは「0.5x」から最大倍率までをシームレスに倍率を変えたいときに使う。タッチで細かくいじれるので、不用意に触ってズレがちだったりする
被写界深度。ポートレートモードでのピントの合う範囲やボケの大きさをコントロールするものと思えばいい。これをいじると、自動的にポートレートモードと同じようになるので、「ポートレートモードの存在意義は?」って感はある
露出。これはそのまま露出補正を行う機能で、カメラを使い慣れている人には便利かも。ただ、スルっと動きすぎるので注意が必要
スタイル。新しいフォトグラフスタイルで、どんな“画作り”にするかを選べる(詳しくは後編で解説する)
トーン。画のトーンを調整したいときに使おう。フォトグラフスタイルを補完するものと思っていい
ということで、けっこうあるよね。
で、使っていて気になったのは操作に結構気を使うことと、誤操作しちゃうこと。意識せず指が動いちゃってズーム倍率が変わったり、露出が補正されちゃったりして、何度か困った。
誤操作の被害が少ないのは「カメラ切替」で(ちょっとでも変わったらすぐ分かるし)、これを使って0.5x→1x→2x(→5x)と倍率を変えられるのはそれなりに便利なので、使うときは大抵それだ。
そういえば、かつて「MacBook Pro」がファンクションキーの代わりにタッチバーを採用したけど、最新モデルではなくなっているし、カメラの世界ではキヤノンが初代「EOS R」で似たようなタッチ式の「マルチファンクションバー」を採用したのだけど、その後どうなったのかとんと聞かない。
キヤノンが初代EOS Rで採用したタッチ式のマルチファンクションバー。その後の製品には採用されなかった
ポイント3:カメラコントロールのカスタマイズはどう?
カメラコントロールで注目したいのは、そのカスタマイズかと思う。
カメラコントロールの設定を開くと、押したときに起動する「カメラアプリ」を変えられる。アプリ側も対応する必要があるようだが、2024年10月初旬現在、わたしのiPhoneにはいっているアプリでは「ProCamera」と「Instagram」が対応していた。
ProCameraはいち早くカメラコントロールに対応しており、ズーム倍率や露出補正ができるようになっていた。
なお、未対応のカメラアプリではシャッターとしても使えないので注意。個人的には、Leica LUXがこれに対応してくれるとうれしい。
カメラコントロールをクリックした時に開くアプリを指定できるまだ対応アプリは少ないようだけど、今後増えそうな気配はする
カメラコントロールの結論
カメラコントロールをスリスリして設定を変えるというインタフェースは、アイデアとしてはいい。けれども誤操作もしやすく、使いこなすのは難しいかなと思う。
でも、シャッターボタンとしては便利で、個人的に、横位置の時はここでシャッター押す癖が付いちゃいました。
なお、2024年内のアップデートで、シャッター半押しでAF/AEを固定して全押しで撮影という「2段階シャッター」が提供される予定なので、カメラ好きの人は“乞うご期待”である。
続けて、カメラの基本画質をチェック!
Copyright © ITmedia, Inc. All Rights Reserved.
-PR-
iPhone Store
1|2|3 次のページへ
advertisement
関連記事
iPhone 16シリーズの「カメラコントロール」は使いやすい? Xperia 1 VIのシャッターキーと比較した正直な感想
「iPhone 16 Pro」と「Pixel 9 Pro」をガチンコ比較 カメラやAIはPixel優位だが、長く使うならiPhoneを選ぶ
「iPhone 16/16 Pro」に触れて実感した進化 16/16 Plusの性能底上げで“間違いない選択肢”に
iPhone 16シリーズ4モデルは何が違う? サイズ、カメラ、ストレージなどの仕様を整理
この記事の関連情報
荻窪圭の携帯カメラでこう遊べ 連載一覧
次回の掲載をメールで受け取る
166
価格と性能のバランスがいい「Xiaomi 14T Pro」 10万円台前半でもいい感じの「ライカカメラ」を楽しめる
165
iPhone 16/16 Proで「フォトグラフスタイル」「オーディオミックス」ってどう? 撮って試してみた結果
164
「iPhone 16/16 Pro」のカメラ機能を比較、基本画質に差はなし? 新ボタン「カメラコントロール」は難易度高し
163
「Google Pixel 9 Pro XL」の“AI推しカメラ”は常用できるレベルなのか? 試してみて分かったこと
162
新生FCNTの「arrows We2 Plus」はカメラも親切 分かりやすいインタフェースでサクサク撮れる
There are 161 past serial articles.
printing
notification
look
Share


コメント